Did you get a huge fresh pumpkin from the pumpkin patch and want to make your own pumpkin puree from scratch? Or is there a pumpkin puree shortage? Here's how to make homemade, unsweetened pumpkin puree that tastes better than canned! Choose your preferred cooking method depending on whether you have an oven or not.
Jump to:
What is pumpkin puree actually?
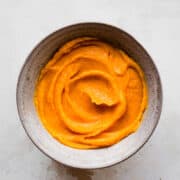
Pumpkin puree is a bright orange pumpkin mash commonly made from steamed or roasted pumpkin. It can be made from one or more types of winter squashes. Pure pumpkin puree has a smooth consistency when blended and a sweet, slightly earthy taste (it may vary depending on the cooking method).
The pumpkin flavor remains subtle and is often enhanced by warm spices such as cinnamon, nutmeg and ginger. It can be used in baked goods or savory recipes (creamy pumpkin puree pasta or pumpkin tomato gnocchi)
- Pure pumpkin versus pumpkin puree: pure pumpkin refers to pumpkin puree that doesn't contain any additives or added spices. It's 100% made of steamed pumpkin (and eventually other squashes).
- Canned pumpkin versus pumpkin puree: both are synonyms and refer to canned or homemade pumpkin puree. The terms can be used interchangeably.
- Pumpkin pie filling versus pumpkin puree: pumpkin pie filling is a sweetened version of pumpkin puree that already contains spices.
Which winter squash to use
The obvious winter squash to use to make pumpkin puree from scratch would be pumpkin. However, you could actually use any squash you wish (e.g., acorn squash, butternut squash). However, some may have a more bitter or more earthy taste.
Butternut squash puree: it is very similar but naturally sweeter than pumpkin puree. It has a fine and silky texture that is smoother and less fibrous than pumpkin. Both can be used interchangeably, although you could reduce the amount of sugar in sweet recipes when using butternut squash puree.
Chestnut (Red Kuri) squash puree is my personal favorite for its rich chestnut flavor. Due to its smaller size, it has a quick cooking time but yields small quantities of homemade pumpkin puree. It's the perfect squash to use in small households or if you don't use this ingredient on the regular.
Expert tips to nail it every time
- Chose small pumpkins. Don't make it too hard on yourself. Small pumpkins are easier to cut and quicker to cook.
- Always wash the pumpkin (skin on) with clear water and brush off any dirt and other residues with a vegetable brush. Pat it dry before cutting.
- Only peel the pumpkin after cooking it. You'll be able to remove the skin much more easily than before cooking. It should come right off in straps. Make sure to let it cool down first to avoid burning yourself.
- Know that taste and texture will always be different, that's normal.
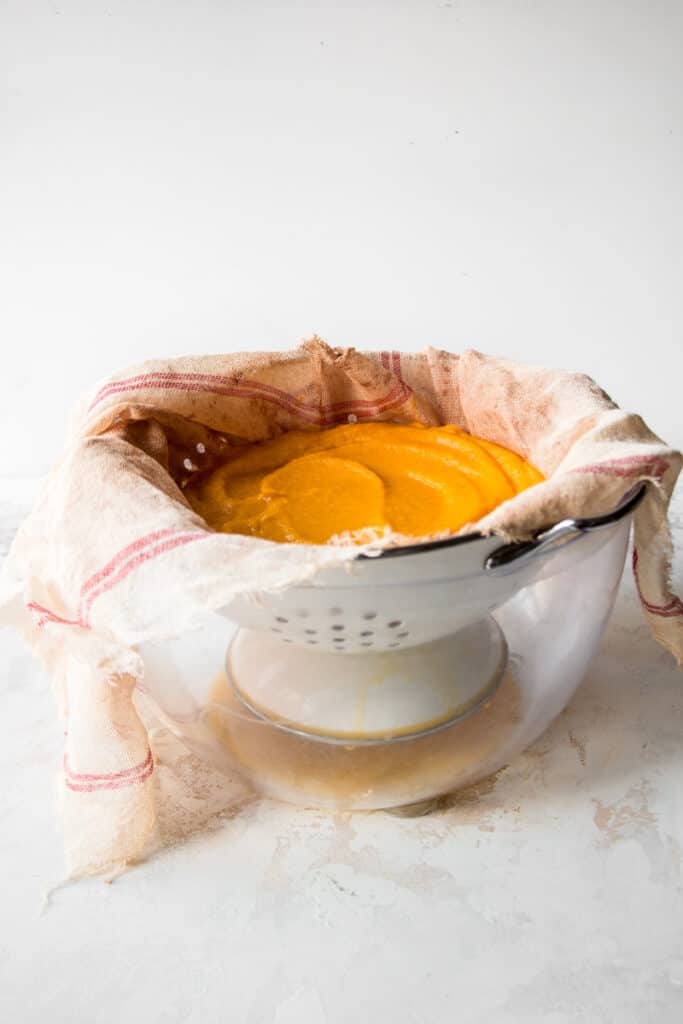
- Drain it overnight in acolander lined with a cheese cloth if it's too watery (see below).
3 Cooking methods (with pictures)
The three cooking methods will result in differently-flavored and colored pumpkin purees. The texture may also slightly vary.
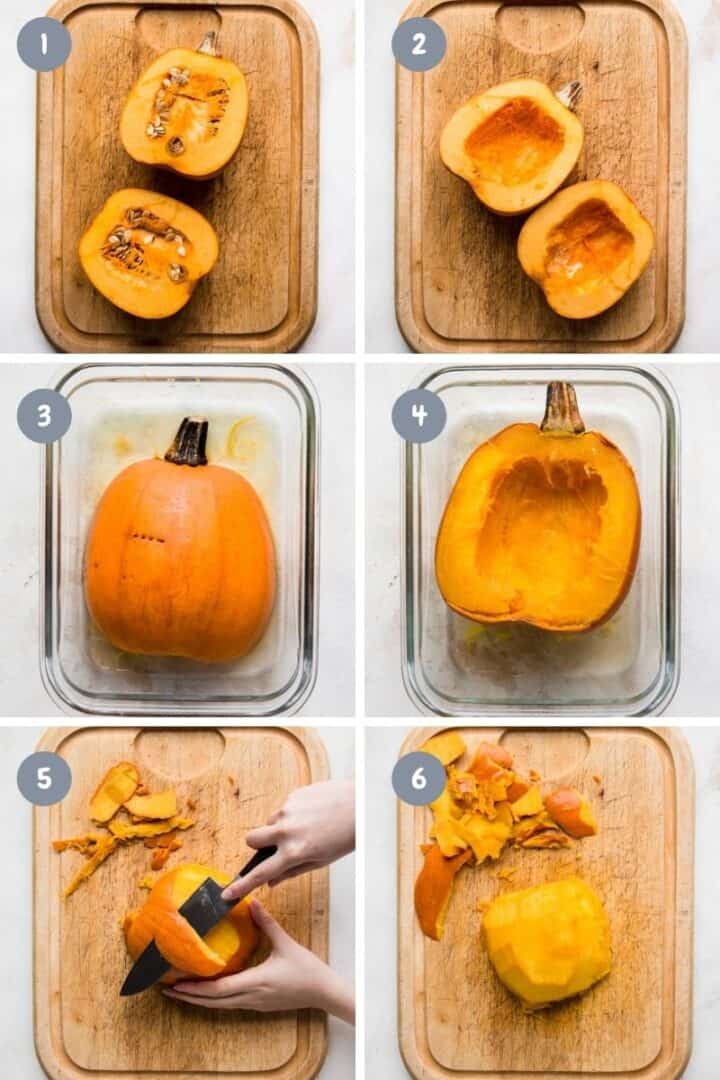
Roasting
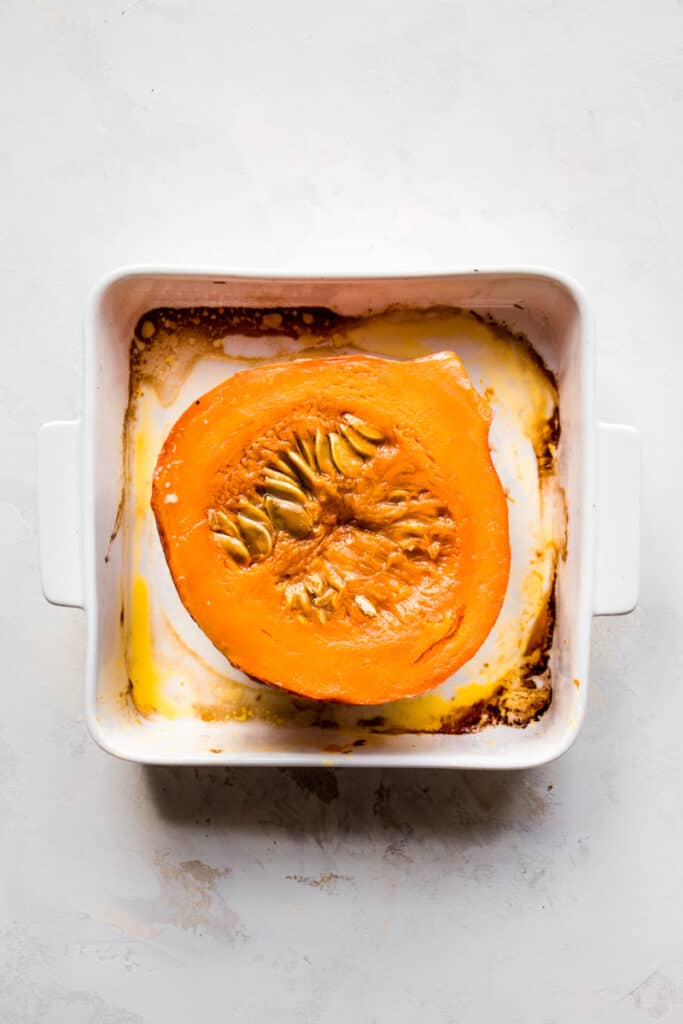
Advantages: roasted pumpkin puree is the most flavorful due to the caramelization process that occurs in the oven. It's an effortless method that doesn't require you to peel or seed the pumpkin prior to roasting.
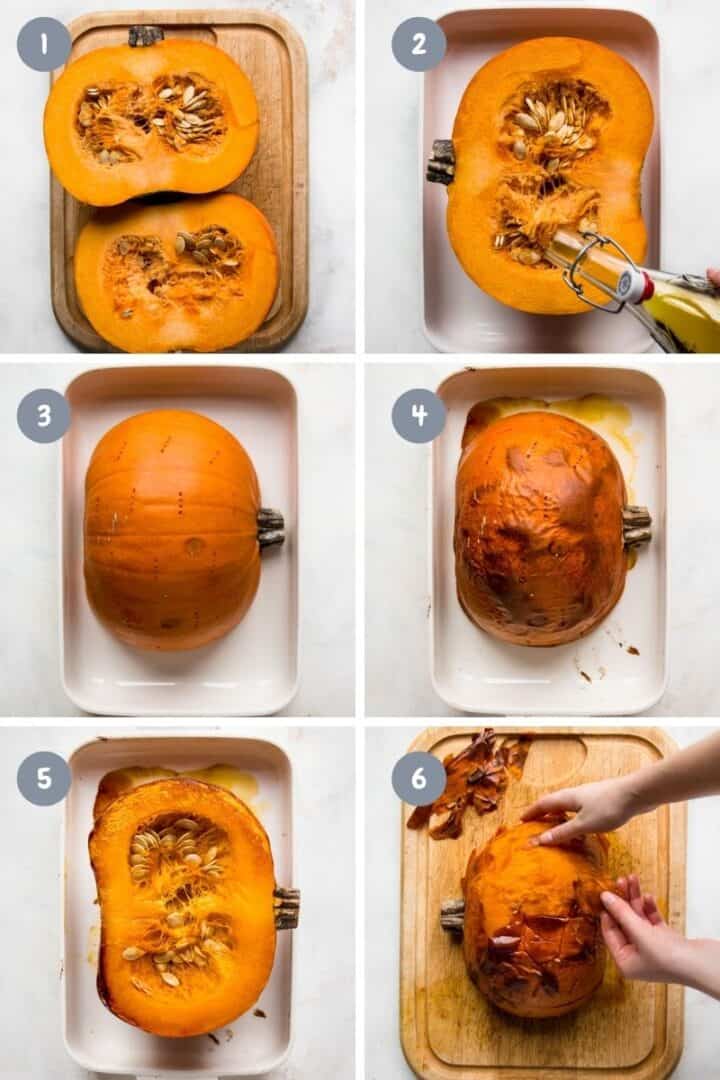
- Cut the pumpkin in half or in quarters if it is huge.
- Coat the cut side with your preferred cooking oil.
- Place the pumpkin cut-side down on a baking sheet or in a baking dish. Prick the skin with a fork to release air while the pumpkin is roasting.
- Roast it cut-side down at 400°F (200°C). The roasting time entirely depends on the weight and type of squash. It can take anywhere between 30 minutes (small butternut squash) to 1 hour (pumpkin, acorn squash).
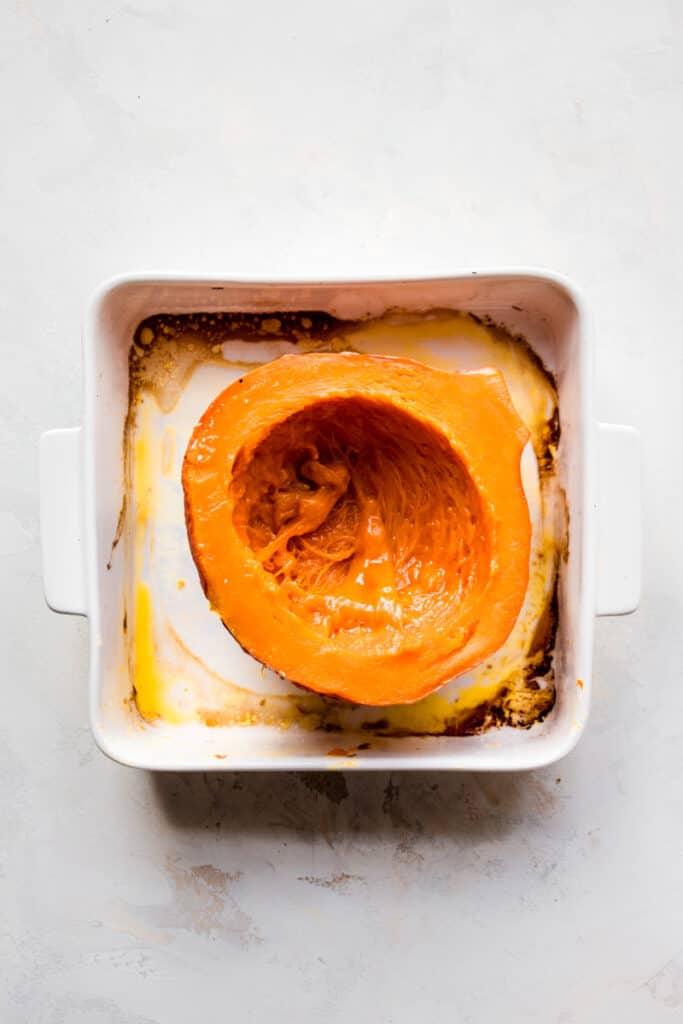
- Once the pumpkin is cooked, let it cool down.
- Scoop out the seeds and peel off the skin. You can use your fingers or a small knife (I find that easier). It should come right off.
The roasted pumpkin is now ready to be pureed (see below).
Check doneness: to make sure the pumpkin is cooked through, prick it with a fork. It should slide through easily.
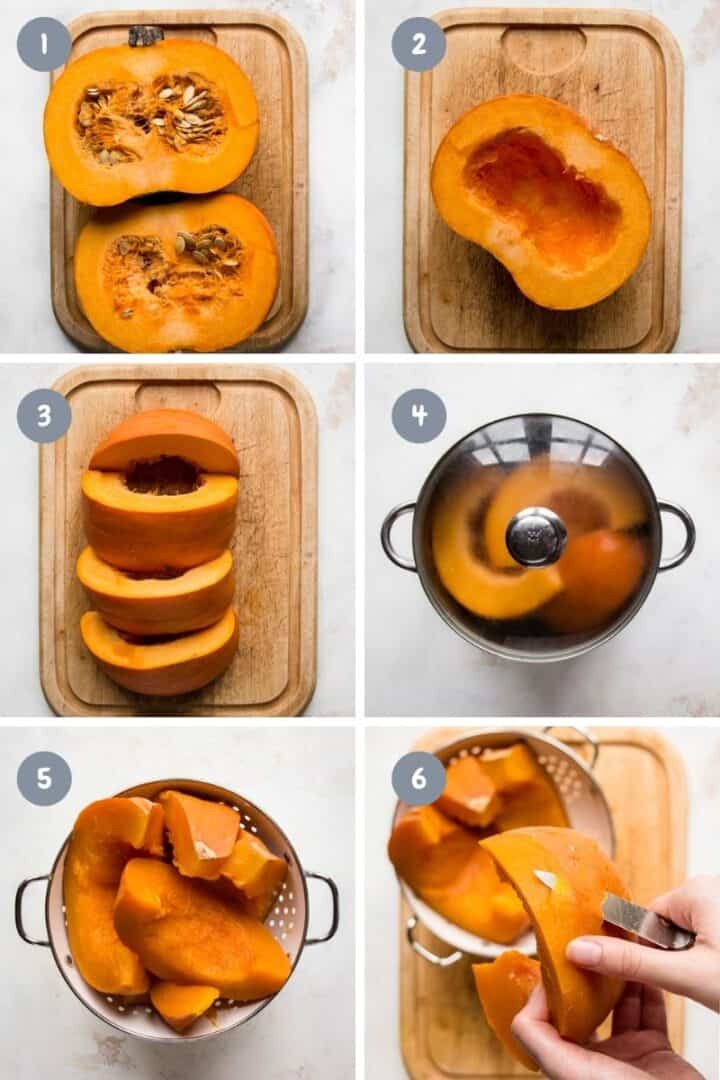
Boiling or steaming
Advantages: boiling or steaming allows you to make pumpkin puree without an oven in a relatively short amount of time.
Boil pumpkin with the skin on! You can peel the pumpkin with your fingers once it's boiled and cooled. The skin will come off much more easily.
- Cut the pumpkin in half.
- Remove the seeds with a spoon.
- Then, cut it into 4 pieces. You could peel the slices with a vegetable peeler or a blunt knife before cooking, or peel them after they are cooked (which is much easier).
- Bring water to a boil. Add the pumpkin to the water, cover with a lid and boil for 20-30 minutes until tender (check doneness with a fork).
- Drain well and let it cool. You can let the pieces sit in a colander for 1 hour to prevent your pumpkin puree to be too watery.
- If you didn't do it already, peel off the skin with small knife. It should come right off.
The cooked pumpkin is now ready to be pureed (see below).
You can also use a steamer basket or a steamer. Fill it with the indicated amount of water. Cut the seeded pumpkin into slices that fit the steamer basket. Steam the pumpkin pieces for 10 to 15 minutes until tender. If you have a large pumpkin, you might have to repeat the process with the remaining pumpkin.
Microwave
Advantages: microwaving is the quickest way to cook pumpkin and doesn't require an oven. It's particularly useful to cook small squashes.
- Cut the pumpkin in half.
- Remove the seeds with a spoon.
- Find a large container that fits your microwave. Place the pumpkin cut-side down in the container with a little water. If necessary, cut the seeded pumpkin into quarters or slices that fit that container.
- Microwave the pumpkin for 10 to 15 minutes until tender (check doneness with a fork). If you have a large pumpkin, you might have to repeat the process with the remaining pumpkin.
- Once it is cooked, let it cool down.
- Peel it with a knife. The skin should come right off.
The cooked pumpkin is now ready to be pureed (see below).
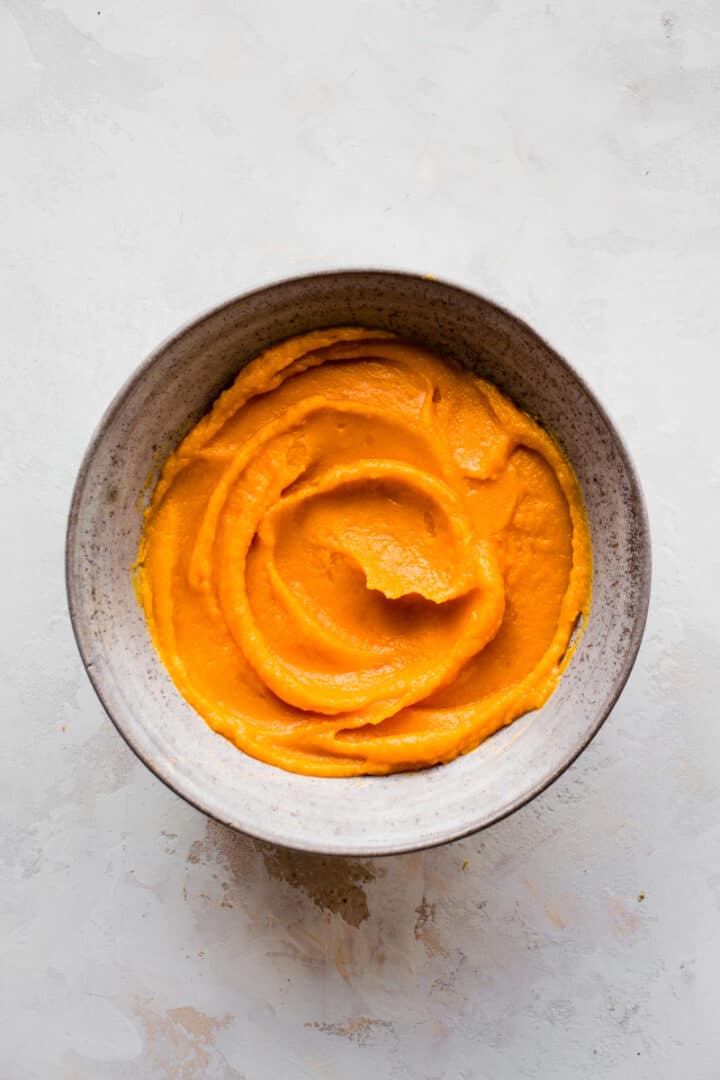
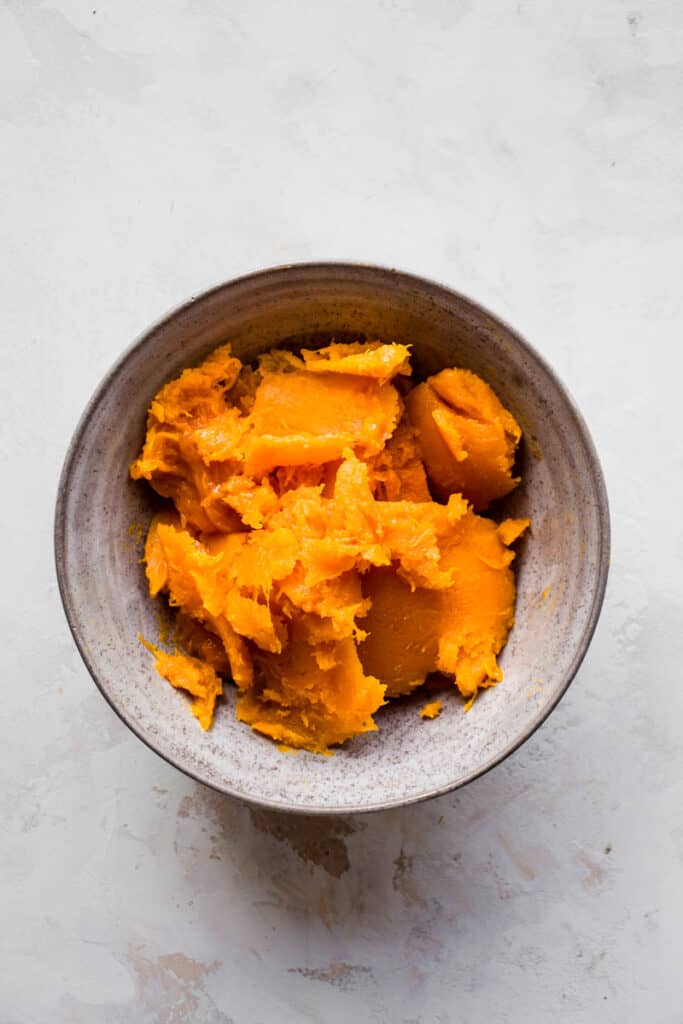
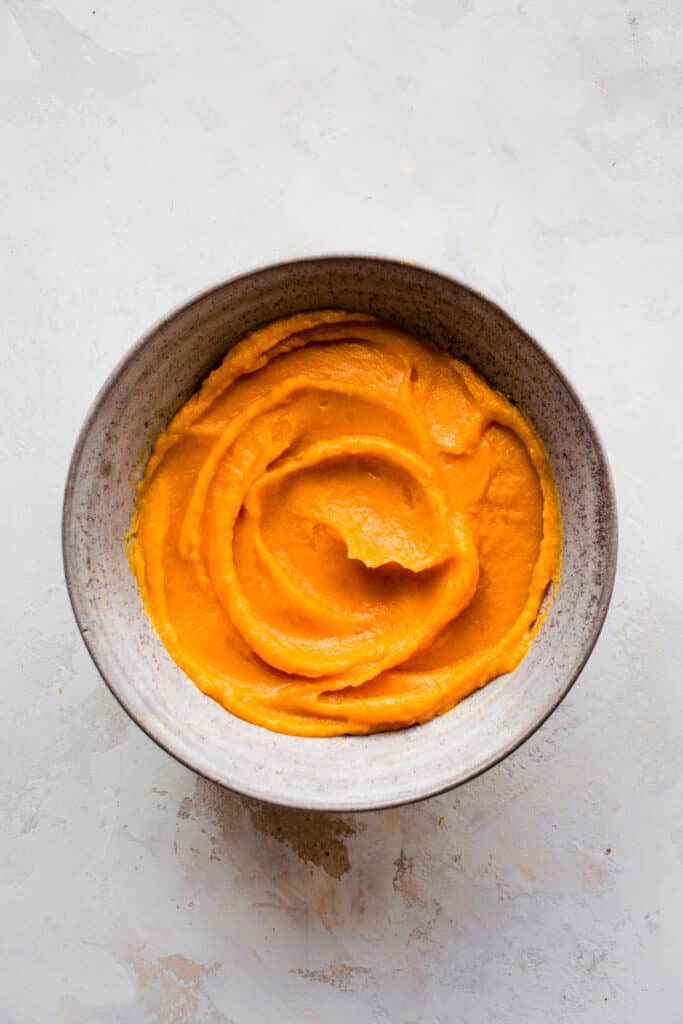
How to make puree with and without blender
With blender
Once the pumpkin is cooked and peeled, cut it into 1-inch pieces (or simply scoop it out). Add them to a large bowl and blend with a stick blender (immersion blender) or place them in the container of a high-speed blender. Blend until the puree is perfectly smooth.
If using a high-speed blender make sure the pumpkin is cold enough to be blended or unscrew to the top part of the lid to let the steam escape.
Without blender
If you don't have a stick or high-speed blender, we recommend using squashes with fine-grained flesh such as butternut squash to make butternut squash puree. These can be easily mashed with a fork or potato masher once they are cooked. Pumpkin has thick and fibrous flesh that can be difficult to get rid of without a powerful blender.
Draining the puree makes all the difference
If the pumpkin puree is too watery after blending, you might need to drain it overnight. It is a necessary step if you want to use the puree for baking. In savory recipes, it's less problematic if the puree is a little watery.
Place a colander or fine-mesh sieve that you lined with a cheesecloth (or a nut milk bag) over a bowl. Add in the pumpkin puree and cover with film or a sustainable alternative. Let it drain overnight in the fridge. This will improve the consistency and make it look like the canned version.

Storage tips
Refrigerating tips. Transfer the pumpkin puree to air-tight containers. It will last for up to a week in the fridge.
How do you know if pumpkin puree is bad? Any change in smell and color is an indication that the puree has gone bad. The formation of mold is also a clear indicator to discard it. If in doubt, don't consume it.
Freezing tips. Make sure the puree has completely cooled down before freezing. Divide it into smaller portions and store it in air-tight containers, zip bags or stasher bags. Divide it into 1 cup portions for easy usage. You can store it in the freezer for up to 3 months. Write down the date on the container/bag before freezing.
How to quickly thaw frozen pumpkin puree? The best way to thaw pumpkin puree is to let it sit in the fridge overnight. If you forgot to take it out of the freezer early enough, you can reheat it in a saucepan over low heat until thawed. You can also microwave it using the defrost function.
Frequently asked questions
The most reliable alternatives to pumpkin puree in both sweet and savory recipes are butternut squash puree or sweet potato puree. You can use replace them at a 1:1 ratio.
In sweet recipes, you could replace pumpkin puree with the same amount of mashed banana or smooth, unsweetened applesauce.
One cup of pumpkin puree weighs about 230 grams.
You can retrieve about 2 cups of pumpkin puree from one 15 oz can.
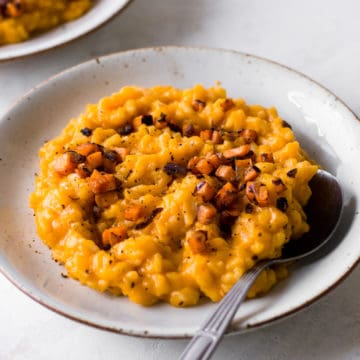
Savory recipes using pumpkin puree
Don’t forget to join the Cooking With Elo newsletter. You’ll get gluten-free and vegan dinner ideas sent right to your inbox.
The recipe
Pumpkin Puree From Scratch Using Fresh Pumpkin
Ingredients
- 8-10 pounds (4-5 kg) medium pumpkin
- 2 tablespoons vegetable oil only if roasting
Instructions
Roasting
- Preheat oven to 400°F (200°C).
- Wash the pumpkin and pat it dry. Cut it in half and coat the cut side with a little oil. Place the pumpkin cut-side down on a baking sheet or in a baking dish. Prick the skin with a fork.
- Roast the pumpkin for 50 minutes to 1 hour until tender (small pumpkins can be done in 30 minutes). Check doneness with a fork. It should slide right through. When tender, remove it from the oven and let it cool.
- Once the pumpkin is cold enough to be held, remove the seeds with a spoon. Peel the pumpkin with your fingers or a small knife. Cut it into 1-inch (2-3 cm) pieces. Blend the pumpkin with a stick blender or in a high-speed blender until smooth (see notes).
Boiling or steaming
- Bring a large stockpot with water to a boil or use a steamer basket. In that case, fill a pot with the indicated amount of water and add the steamer basket in.
- Wash the pumpkin and pat it dry. Cut it in half and remove the seeds. Then, cut it into 4 large slices. Optionally peel the slices with a vegetable peeler or a knife. You can also peel the slices after boiling (the skin will come off more easily).
- Add the slices to the pot with water or the steaming basket. Cover with a lid and cook for 20 to 30 minutes until soft. Steam for about 15 minutes. Check doneness with a fork.
- When cooked, drain well (to prevent to puree from being too watery) and let the slices cool down. Peel them with a small knife if you didn't do it beforehand. Cut the slices into 1-inch (2-3 cm) pieces. Blend with a stick blender or in a high-speed blender (see notes).
Microwave-cooking
- Find a large container that fits in your microwave. Wash the pumpkin and pat it dry. Cut it in half and remove the seeds. Place it cut-side down in the container with a little water. If it is too big, cut it into slices.
- Microwave the pumpkin uncovered for 10 to 15 minutes until tender. Check doneness with a fork. If tender, remove the pumpkin from the container and let it cool.
- When it is cold enough to be held, peel it with a knife. Cut the pumpkin into 1-inch (2-3 cm) pieces. Blend with a stick blender or in a high-speed blender (see notes).
If the pumpkin puree is a little watery
- Place a colander on top of a bowl. Line the colander with a cheesecloth. Add in the pumpkin puree and cover with foil (or a sustainable alternative). Place it in the fridge and let it drain overnight. The puree will thicken and be better adapted for baking.
Notes
- Smaller pumpkins will have shorter cooking times. Always check doneness with a fork. Once it slides in easily, the pumpkin is cooked.
- If using a high-speed blender make sure the pumpkin is cold enough to be blended or unscrew to the top part of the lid to let the steam escape.
- If you don't have a stick or high-speed blender, you can cut the pumpkin into very small pieces and try mashing it with a fork or potato masher. It will be easier if you use squashes with fine-grained flesh, such as butternut squash. Pumpkin has thick and fibrous flesh that can be difficult to get rid of without a powerful blender.
- Refrigerating tips. You can store pumpkin puree in air-tight containers for up to a week in the fridge. Freezing tips. Make sure the puree has completely cooled down before freezing. Divide it into smaller portions (e.g., 1 cup) and store it in air-tight containers, zip bags or stasher bags. You can store it in the freezer for up to 3 months.
Nutrition
Leave a star rating and review below. Thank you!
Loved it? Please rate it!
If you tried this recipe or any other recipe from the blog, make sure to let me know how you liked it by leaving a star rating and a comment below. Your feedback really matters! To never miss a recipe, follow me on Instragram, Pinterest and Facebook.
Looks so delicious, will try one this weekend!